‘Spirograph’ includes toothed rings which can be used with small disks to draw Spirograph patterns inside the ring. The small toothed rolls around the inside of the fixed ring, producing the typical Spirograph spirals.
The diagram above shows how this works. The small circle rolls around inside the larger circle (which represents the inside of the ring). If there is no slippage, the small circle rotates in the opposite direction to its movement around the larger circle.
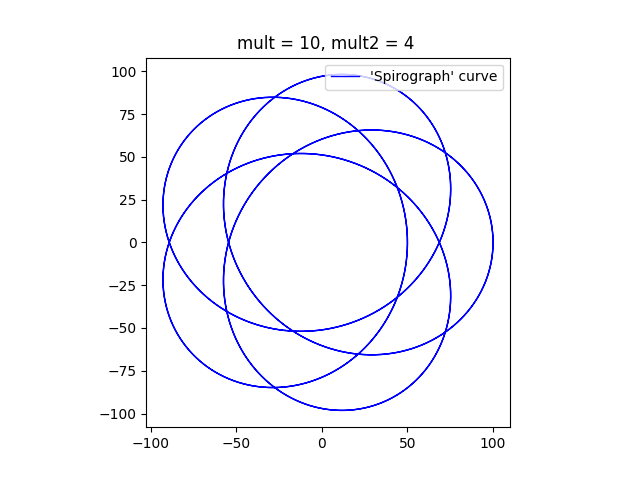
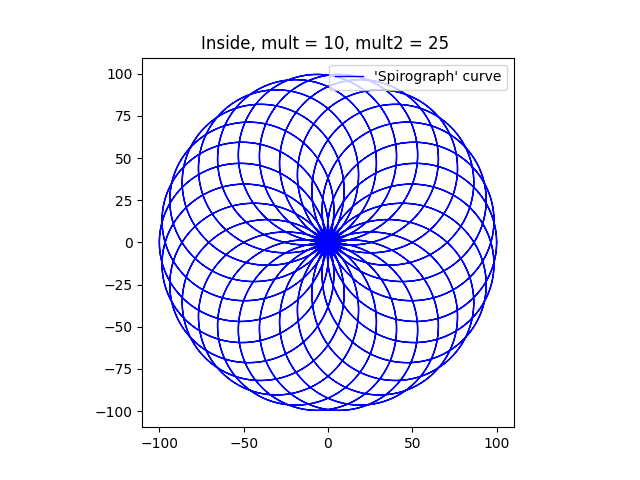
I modified my Python program to simulate this situation. As before, the rate of rotation of the smaller circle can be controlled by varying the ‘mult2’ variable in the program. To start with I used a small value for the variable as shown below.
The diagram has five ‘lobes’ and an empty patch in the middle. The curve can never go through the centre. If the ratio of the sizes of the circles is less than one half, then smaller circle is not big enough to reach the centre of the larger circle. If the ratio of the sizes of the circles is greater than one half, then the point on the circumference of the smaller circle that is drawing the curve (point D on the diagram above) never falls on the centre of the larger circle. If the ratio of sizes is exactly one half, all the loops will pass through the centre of the larger circle.
As the multiplier ‘mult2’ is increased, the curve comes to resemble the circular shape of a typical Spirograph. I think that it looks a bit like a torus or a donut.
I’m not going to try to emulate the behaviour of the non-circular Spirograph components. In fact, I have only emulated the circular ones, but not completely. I’ve only plotted the curves that would result if the point P (the pen) corresponded to the point D (on the smaller circle) in the diagram above.
Here’s one final plot, where the ratio of the smaller circle to the larger circle is exactly one half. The program draws a pleasant chrysanthemum or dahlia shape.
Finally, here’s the Python program that I used to draw these diagrams. To get the different figures, I’ve changed the multipliers, mainly ‘mult2’. I’ve also changed the sizes of the circles (variables ‘large’ and ‘small’) to get some of them.
import numpy as np
import matplotlib.pyplot as plt

# Dimensions of two circles
r1 = 100
r2 = 50
# c0 = [0,0]
# c1 = [1,0]

# Multipliers
mult = 10   # Used to generate the number of points plotted.
mult2 = 25  # Controls speed of rotation of the smaller circle, relative to the first.

ax = plt.subplot()
ax.set_aspect( 1 )

# Parametric array for the larger circle
t1 = np.linspace(-2 * np.pi, 2 * np.pi, mult * 360)
# Parametric array for the smaller circle
t2 = t1 * mult2

# Calculation of X/y cordinates using the parametric arrays.
# x0 and y0 are the coordinates of the tangential point, B.
x0 = r1 * np.cos(t1)
y0 = r1 * np.sin(t1)
# plt.plot(x0, y0, label=("Large circle"), color = 'r', linewidth = 2, linestyle = '--')
# x1 and y1 are the cordinates of the centre of the small circle, C.
x1 = (r1 - r2) * np.cos(t1)
y1 = (r1 - r2) * np.sin(t1)
# x1a and y1a are the coordinates of D relative to C.
x1a = r2 * np.cos(t2)
y1a = r2 * np.sin(t2)
# plt.plot(x1a, y1a, label=("Small circle"), c = 'r', linewidth = 2, linestyle = '--')
# x2 and y2 are the coordinates of the desired point on the curve, D.
plt.plot(x0[0],y0[0], color='r')
# The small circle rolls in the opposite direction if it is inside
x2 = r2 * np.cos(-t2)
y2 = r2 * np.sin(-t2)

# Plot the Curve
# plt.plot(x1 - 1.5 * x2, y1 - 1.5 * y2)
plt.plot(x1 + x2, y1 + y2, label=("'Spirograph' curve"), c = 'b', linewidth = 1)

plt.title("Inside, mult = {}, mult2 = {} ".format(mult, mult2))
plt.legend(loc="upper right")
plt.show()
‘Spirograph’® is a set of devices which can be used to draw some interesting looping curves. It consists of various toothed wheels and other toothed shapes with small holes them. A wheel or other shape is chosen, and fixed to the drawing surface. A second wheel is placed so that its teeth interlock with the teeth on the second wheel and a pen is inserted into a hole in the second wheel. The pen is moved to keep the two gear wheels enmeshed at all times. As a result the pen traces out a curve.
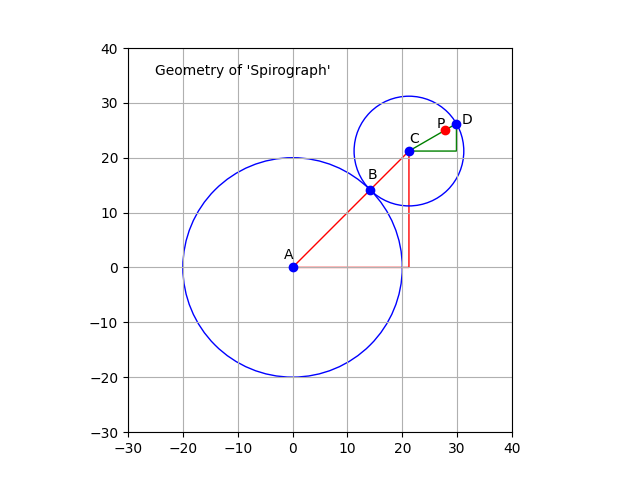
This can, of course, be plotted mathematically, using a tool like ‘matplotlib’. The above diagram shows how the Spirograph system works. The circle representing the first wheel is centred on point A and is fixed. The other circle is centred on point C, rolls around the first circle, and is always in contact with the first circle at point B. The point P is a point inside the smaller circle, and the line CD is the radius which passes through point B.
It is easy to see that the centre of the smaller circle (C) travels in a larger circle around the static circle. This larger circle (not drawn) has a radius is equal to the sum of the radii of the two circles. This radius corresponds to the line AC. As C travels around the circle, the smaller circle, CD, rotates. Meanwhile, the point P on CD traces out the curve we are interested in.
In the ‘Spirograph’ case, the two circles are linked by the teeth on the gears wheels. This connection ensures that the smaller circle rotates at a fixed speed. The Wikipedia page on the ‘Spirograph’ system mentions that the teeth prevent any slipping.
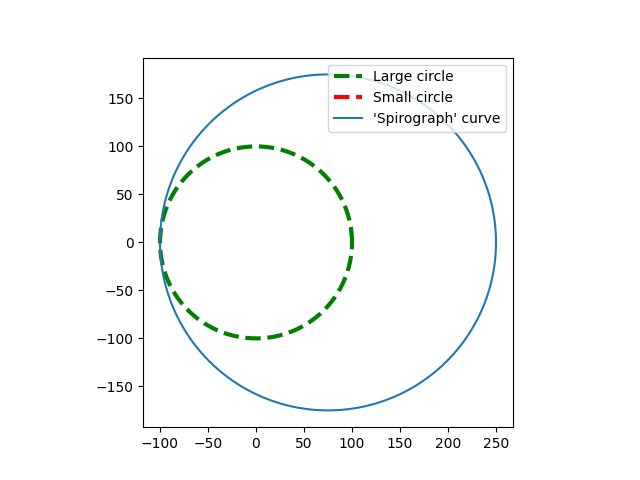
In the program generated case, smaller wheel can be programmed to rotate at any rate that is desired, with ‘slippage’. It can, for example, be programmed to move around the large circle without rotating at all. The next image shows what happens then. [Note: For simplicity, the point P is assumed to be located on the circumference of the small circle.]
The plot shows large fixed circle drawn with a dashed line. The small circle is not visible because it is actually a single point. The ‘Spirograph’ curve is just a larger circle offset from the centre of the large circle.
If the small circle rolls around the larger circle without slipping, then the ratio of small circle to the large should be exactly in the ratio of the radius of the small circle to the radius of the large circle. So in this next image, the size of the small circle is 75, and the size of the large circle is 100. The smaller circle rotates 100/75 (4/3) times every time it goes around the large circle.
I’m going to finish up with a couple more images that look more like a standard ‘Spirograph’. The point P is still on the circumference of the smaller circle, but this makes little difference to the plots.
This show a typical curve that a ‘Spirograph’ would plot. The ‘mult2’ parameter controls how many lobes the figure has. In this case, with a value of 25, there should be 24 lobes.
Finally, this image, with a mult2 value of 67 will have 66 lobes. When a Spirograph Wheel rotates around a fixed wheel, the pattern typically shows a rosette of loops, with a hole in the middle where the fixed wheel is located. I’m going to experiment with a moving wheel inside and if it is interesting I might do another post on the topic of ‘Spirographs’.
?Below I have pasted the program that I used to draw these images. Feel free to take it and alter it as much as you like.
import numpy as np
import matplotlib.pyplot as plt

# Dimensions of two circles
r1 = 100
r2 = 75
# c0 = [0,0]
# c1 = [1,0]

# Multipliers
mult = 10
mult2 = 67  # was 11

ax = plt.subplot()
ax.set_aspect( 1 )

# Parametric array for the larger circle
t1 = np.linspace(-2 * np.pi, 2 * np.pi, mult * 360)
# Parametric array for the smaller circle
t2 = t1 * mult2

# Calculation of X/y coordinates using the parametric arrays.
# x0 and y0 are the coordinates of the tangential point, B.
x0 = r1 * np.cos(t1)
y0 = r1 * np.sin(t1)
# plt.plot(x0, y0, label=("Large circle"), color = 'g', linewidth = 1, linestyle = '--')
# x1 and y1 are the cordinates of the centre of the small circle, C.
x1 = (r1 + r2) * np.cos(t1)
y1 = (r1 + r2) * np.sin(t1)
# x1a and y1a are the coordinates of D relative to C.
x1a = r2 * np.cos(t2)
y1a = r2 * np.sin(t2)
# plt.plot(x1a, y1a, label=("Small circle"), c = 'r', linewidth = 3, linestyle = '--')
# x2 and y2 are the coordinates of the desired point on the curve, D.

x2 = r2 * np.cos(t2)
y2 = r2 * np.sin(t2)

# Plot the Curve
# plt.plot(x1 - 1.5 * x2, y1 - 1.5 * y2)
plt.plot(x1 + x2, y1 + y2, label=("'Spirograph' curve"), c = 'b', linewidth = 1)

plt.title("mult = {}, mult2 = {} ".format(mult, mult2))
plt.legend(loc="upper right")
plt.show()
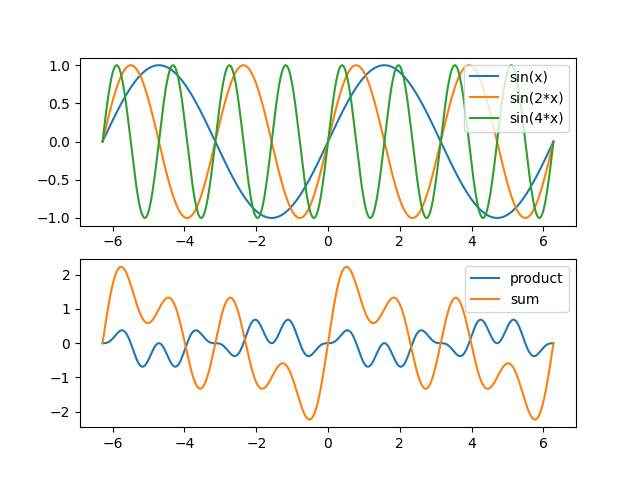
What is ‘matplotlib’? It’s a Python package which can be used to plot everything from a simple parabola or sine wave right up to complex statistical data. Of course, I use it just to print interesting curves, like the one above. I’ll discuss the program I wrote below.
Since it is a Python package it helps if you know how to write Python programs, but I don’t dive too deep into Python. Anyway, the above curves were printed by a program that is only eleven lines long!
At the top of the Python code, we need to tell it to use ‘matplotlib’ and I’ve included a line to tell the code that we need to use the ‘numpy’ maths package. Here’s the first bit of the program:
import matplotlib.pyplot as plt  # This is the plotting library
import numpy as np               # A common Python package
Plotting something involves matching one set of data against another. Commonly these sets of data are named ‘x’ and ‘y’, but they can have any names that the plotter desires. The relevant code in this program is as follows:
max_range = 1000
x = np.linspace(-2*np.pi, 2*np.pi, max_range)
y = np.sin(x)
The line that starts ‘x =’ uses the numpy ‘linspace’ routine to generate a numpy array of one thousand (max_range) elements evenly spaced between -2 time pi and 2 times pi. The line that starts ‘y =’ then creates another numpy array, taking the individual elements of the array x, applying the numpy sine function and appending the result to the end of the array y.
In the earliest version of this program, I created the two numpy arrays by means of a loop, but by creating numpy arrays using this method, I can do it in two lines. Like all good ideas I got it from someone else’s program on the Internet. There is only one program, the old joke goes, and that is the “Hello World!” program, and all other programs are descendants of that single archetype.
OK, so, I created two more arrays using the same technique, and here are the two lines of code:
z = np.sin(2*x)
zz = np.sin(4*x)
So, I could have drawn three plots, one for each array, but that wouldn’t have been that interesting, so I decide to plot the sum of all three arrays (against the x array), and also the product of all three arrays (again, against the x array). Numpy arrays make this easy.
# y = np.sin(x) * np.sin(2*x) * np.sin(4*x)
plt.plot(x, y * z * zz, label='product')
# y = np.sin(x) + np.sin(2*x) + np.sin(4*x)
plt.plot(x, y + z + zz, label='sum')
The ‘plot’ statements each draw a line in the final figure, and generate a label for the line. The comments describe the curve in an x/y format, in a simple mathematical style .
The final couple of lines (see below) are needed to show the labels and the complete figure. Below is the whole Python program, comments and all.
import matplotlib.pyplot as plt
import numpy as np

# Basic Figures
# sine wave
max_range = 1000
x = np.linspace(-2*np.pi, 2*np.pi, max_range)
y = np.sin(x)

# sine wave, freq * 2
# x = np.linspace(-2*np.pi, 2*np.pi, max_range)
z = np.sin(2*x)
zz = np.sin(4*x)

# y = np.sin(x) * np.sin(2*x) * np.sin(4*x)
plt.plot(x, y * z * zz, label='product')
# y = np.sin(x) + np.sin(2*x) + np.sin(4*x)
plt.plot(x, y + z + zz, label='sum')

plt.legend()
plt.show()
To close the post, I’m going present a more complex example. This one combines the plots described above, with a separate subplot of the three waves that were used to create the first subplot. At the very end is the source code.
import matplotlib.pyplot as plt
import numpy as np

# Basic Figures
# sine wave
max_range = 1000

fig, (ax1, ax2) = plt.subplots(2, 1)

# The x array runs from -2*pi to +2*pi
x = np.linspace(-2*np.pi, 2*np.pi, max_range)

# One component of the final plot
y = np.sin(x)

# sine wave, freq * 2
z = np.sin(2*x)
# Freq * 4
zz = np.sin(4*x)import matplotlib.pyplot as plt
import numpy as np

# Basic Figures
# sine wave
max_range = 1000

fig, (ax1, ax2) = plt.subplots(2, 1)

# The x array runs from -2*pi to +2*pi
x = np.linspace(-2*np.pi, 2*np.pi, max_range)

# One component of the final plot
y = np.sin(x)

# sine wave, freq * 2
z = np.sin(2*x)
# Freq * 4
zz = np.sin(4*x)
ax1.plot(x, y, label='sin(x)')
ax1.plot(x, z, label='sin(2*x)')
ax1.plot(x, zz, label='sin(4*x)')

legend1 = ax1.legend()

# y = sin(x) * sin(2x) * sin(4x)
ax2.plot(x, y * z * zz, label='product')
# y = sin(x) + sin(2x) + sin(4x)
ax2.plot(x, y + z + zz, label='sum')

legend2 = ax2.legend()

plt.show()
Last year I posted an article which discussed some simple arithmetic and algebraic expressionss that people are posting on the Internet. I mentioned in that post that the questions are not posted to be answered. They are posted to incite discussion. Since then, there has been an upsurge of such postings, and I am going to address this topic further and expand on it.
Most people have left school with the impression that there is only one way to solve an arithmetic or algebraic question, and there is only ever one correct answer.
This is true, in a way. The rules of maths are rigid. However, when we write a problem down on paper, we write down a representation of the maths, in symbols. In the simplest case, we write down the symbol for a number, eg the symbol ‘7’. However in Ancient Rome, a mathematician would have written the symbols ‘VII’ to represent the same number. Even when we say the word ‘seven’, the word is only a name for the number.
Of course, our minds cut out all these distractions, and we, inaccurately, conflate the number and the symbol or name for the number. “This is the number seven,” we say, pointing to the symbol, but it isn’t.
When we add mathematical operations into the mix, things get more complicated of course. We write “7 + 3”, and think “Seven plus three”, mentally come up with the sum, the number 10, and think everything is fine.
But what if we were from a culture that reads and writes from right to left? We might possibly think “Three plus seven”, and would come up with the sum, the number 10.
However the language that we would use is unlikely to be the same as the one that I am using here, and the symbols would be different. Nevertheless, in some eldritch way, the maths is identical.
In this rather long preamble I have suggested that mathematics, specifically arithmetic and algebra, is independent of the symbols on the paper, and, probably, independent of the way our brains think of maths.
The Need for an ‘Order of Operations’
From now on I’m going to assume that that we are not from a culture that reads and writes from right to left, but the following reasoning can be expressed in a similar way for those who do write that manner.
Now, if I multiply two numbers I get a third number. I’m not too concerned about what multiplication actually is, but essentially I am taking two (or more) number, doing something with them and ending up with a single, different number. I can communicate this idea to someone else by writing down the two numbers with a multiplication symbol between them. I might then write a ‘=’ symbol next, and then the result.
5 x 4 = 20
A string of multiplications is easy:
5 x 4 x 2 = 40
Similarly with addition:
5 + 4 + 2 = 11
So far so good. Note that it makes no difference which order we perform the multiplications or additions. If we decide to start with the ‘2’, rather than the ‘5’, we get the same answer at the end. ‘5 x 4′ gives us ’20’ and so does ‘4 x 5’.
Problems arise when we introduce division and subtraction into the mix. Firstly, you can’t reverse the order in which you perform a subtraction or division:
Even worse things happen when you mix addition and subtraction with multiplication and division. It’s important to note that the order that we should perform operations on numbers is not an essential part of arithmetic and algebra, but is related to the way we portray numbers and operations on paper.
So, mathematicians introduced the concept of the order of operations. This simply means that there are conventions for writing down arithmetical and other mathematical processes, in a way that someone else can take the expression, evaluate it and reach the same result as the originator of the expression.
There are ways of writing mathematical expressions which do not need an order of operations (or brackets, see later), indicating that the issues are not something within mathematics itself, but I’ll leave that for another time.
There are two ways of of writing an arithmetic or algebraic expressions in a way that can be communicated to someone else. Firstly, an order of operations rule can be applied to writing such expressions. Then expressions such as
1 - 21 / 7 + 4 * 2 = 6
can be written and understood unequivocally. The order of operation rules that are most often used are usually referred by the mnemonic PEMDAS or BODMAS.
Secondly, brackets can be used to specify the order that operations should be performed. The previous example could have been written as
(1 - (21/7)) + (4 * 2) = 6
You can always add brackets to an expression, even if they are not essential, as above.
So, if we agree to use PEMDAS, we can pass equations to and fro with a good chance of agreeing on the results, but there are some edge cases.
Is PEMDAS enough?
Some people write things like
2 / 3(5 -2)
I think that this is badly formed, and one should not write ‘…3(5…’, but people do it all the time. That said, there is an implied multiplication symbol between the ‘3’ and ‘(‘, so the same thing, with the implicit multiplication made explicit is
2 / 3 * (5 - 2)
Now there are two schools of thought on how this expression should be processed. The first group say that there is nothing special about the multiplication sign and the rules should be applied as usual. That is, from left to right as each symbol is reached.
2 / 3 * (5 - 2) = 2 / 3 * 3 = 2
The other group say that because the multiplication sign is implicit, the multiplication between the ‘3’ and the bracketed item should be processed as soon as the bracket is evaluated, before the usual left to right processing. In other words
2 / 3 * (5 - 2) = 2 / 3 * 3 = 2 / 9 = 2/9
The two schools of thought result in different answers, so which is correct? The answer is either or both. It depends on what the writer intended, and he/she could have used a set of brackets and made certain that the idea was communicated properly.
Why is it such a big thing on the Internet?
People like to cause arguments! So they post ‘quizzes’ on the Internet which are ambiguous, and then sit back and watch the fireworks. Other people read the posts and provide answers which are informed or not informed as the case may be.
Then those who think that they know, mock those who they think are wrong. Neither side acknowledge the fact that it is a communications problem. There are those who try to point this out, but they are often ignored.
Those who know of BODMAS/PEMDAS are usually adamant that they are right because it’s maths and they were taught it, right? Those who don’t are ridiculed. The BODMAS/PEMDAS believers are certain that they are correct because, it’s maths, isn’t it, and maths is never wrong. They lose track of the fact that PEMDAS/BODMAS is just a convention , and other conventions, such ‘strict left to right’ or SADMEP/SAMDOB (the reverse of BODMAS/PEMDAS) could be used. Providing both parties agree on a convention, they can communicate mathematical (well, arithmetical or algebraic) ideas successfully to each other.
Those who have been taught about implied multiplication by juxtaposition dispute the answer with those who haven’t heard of it, but really, the answer to the poser is irrelevant. The reason for that people post these dubious and intriguing equations is not to seek a value for equation. It’s not to find ‘the answer’. It’s usually to stir discussion, and the rowdier the discussion is, the better from the poster’s point of view.
Every modern word processing program comes with a feature, usually called ‘styles’, which allows you to control the look of your final document. Microsoft Word does. LibreOffice and OpenOffice do. I’d be surprised if there was a major program word processing program that doesn’t.
A style is a collection attributes, such as font, font size, indentation, alignment, colour, and many other attributes that describe an element in a document. The element can be a page, a character or set of characters, a paragraph, an image, and many other things. A style can be applied either by default, or by selecting an element and clicking on a list of available styles.
Sounds complex? It isn’t really. When you want to create a heading for example, you can type some text, select it, change the font type to make it bold, change the font to make it stand out, and increase the size. Or you could simply type the text and then apply one of the builtin Heading styles with a single click and everything is done for you.
I’m mostly concerned here with paragraph styles. That is, styles which apply to whole paragraphs, and not just single characters or words. In MS Word, LO Writer and other word processing programs, if you start typing a paragraph it will be formatted according to a default style. In MS Word I believe it is called “Normal”. In LibreOffice it is “Default Paragraph Style”. The current paragraph style is usually shown somewhere in the editing screen.
(In my text below I will refer to things in LO Writer terms, because that is what I use. But the concepts should apply to MS Word and probably other word processing programs too, even if the details are different.)
It is my strong belief that everything that affects the look and feel of a document should be achieved with styles, because it makes it so much easier to change things.
For instance, suppose you decided to make one of your paragraphs stand out. You could select the paragraph text and make it bold using the style toolbar at the top of your editor screen. That would work.
But several hours later and many pages later, you decide to also indent it. You have to search back through the document for it. Again you could use the on-screen tools to indent the paragraph. Again, that would work.
You return to end of your document, and create another paragraph, which you bold and indent. So far, so easy. But then, you decide that the bold paragraphs would look better in a different font size. Now you have two places to go to change the font and each time you create a bold paragraph, you need to bold it, indent it, and change the font to be consistent.
By the time that you have six or more bold paragraphs, and you want to change something else about them, you will find yourself flicking about in your document. And what if you miss one of the bold paragraphs? Your formatting is no longer consistent!
It would be a lot easier if you had created a “Bold Paragraph Style” (based on the “Default Paragraph Style” for example) the first time that you decided that you needed a bold paragraph. Then you could change all the occurrences of the bold paragraphs without needing to visit all of the occurrences individually. Just change the style!
Creating a new style is not hard. You don’t have to supply all the attributes. You base your new style on an existing one, and just change the things that you want to be different.
I would avoid changing the builtin styles. This is because every style except the “Default Paragraph Style” is based on another style, and all builtin styles are descendants of the “Default Paragraph Style”. In other words the style system is hierarchical, and if you change the “Default Paragraph Style”, any styles which inherits from it, directly or indirectly, may change.
I would not use “Default Paragraph Style” for ordinary text paragraphs, as it is the ancestor of all builtin style. Instead I would choose “Text Body” or one of the styles that inherit from it, and then the consequences are limited.
Since styles are arranged hierarchically, a style such as “Heading 1” for example inherits from the style “Heading”, which in turn inherits from the “Default Paragraph Style”. So some of the settings of “Header 1” come from “Heading” and some from way back in “Default Paragraph Style”.
This is all pretty straightforward and logical, but difficult to explain. The main lesson is that if you use styles, be really cautious about changing the builtin styles, as changing one style may affect any styles which inherit from it.
This is not a good reason to avoid styles as they can make life so much easier for you!
But what if you want all your documents to have the same formatting. The chapters of a book should ideally all look the same, so that when you combine them, it all looks neat and tidy.
You don’t have to modify the styles in each document that you create! That would be tedious and error prone. Instead you can take a document that is in the format that you require, and save it as a template. I’m not going to detail the process here, because there are a couple of ways of doing it in LibreOffice Writer, and that is almost certainly true in MS Word and other word processing programs too.
You can edit the template to remove all the text, if you wish, but the template will have all the necessary styles in it, and writing a new chapter will be easy, with just a click now and then to apply the styles!
One final point is that once you have created a template and are using it to create documents, then everything is not set in concrete. You can change the styles in the template and revisit and save your documents to update the styles in them. This may be tedious, but it is simple! You can even apply a template retrospectively to your old documents, but that is beyond the scope of this article.
In conclusion, I strongly believe that anyone who uses a word processing program that provides a style-like feature and a template-like feature should use the features in almost situations. OK, you write a letter and may think that you would not need to style that, but then you come to write another similar letter. If you had spent a few minutes styling your first letter, you could use it as a template for any subsequent letters. “Dear Mum…”
Don’t be scared of styles. They aren’t really that complex. Styles will not cause you to lose any work or break your word processing program. If things get too messy you can always cut and paste your text into a brand new empty document. I ended up with a mess because I like to experiment with things and only read the documentation after I’ve tried something (and usually screwed it up). But my documents are going to look perfect by the time that I’ve finished.
I use LibreOffice Writer for writing my stories and for other similar writing tasks. It’s free and it runs on Linux, and it does everything that Microsoft Word™ does and probably more.
I haven’t got anything against the current version of MS Word. It’s a very good program, but it isn’t free, it doesn’t run on Linux, and I’m not keen on the interface, as it is, in my opinion, needlessly complex. But then again, I’ve not used it much.
I have used MS Word extensively in the past, and my memories of using it are not pleasant ones. I’ve lost work that I have done in it on many, many occasions. although that was many, many years ago!
However, in spite of my preference for LO Writer over MS Word, I’m always on the lookout for something else. After all, these fine products are general purpose word processors, and I wondered if there were programs designed to specifically write short stories and longer works.
And of course there are. Many of the writing programs only run on Windows, and I prefer Linux, but I decided to give the Windows-based software options a chance. Who knows? But sadly, I’ve found that the offerings are disappointing when compared with LO Writer and MS Word.
Many of the programs that I’ve looked at are not pretty, but if they work, does that matter? They don’t have as many features as MS Word or LO Writer, but again, if they do the job, so what? No, the real reason for my disappointment is related to the way that I work. It’s all about ‘styles’.
A ‘style’ is a collection of rules which describe how the document should appear. There are subsets of these rules, which apply only to parts of the document. For instance there will be rules for paragraphs, other rules for whole pages, and rules for the whole document. Once set up to the writer’s satisfaction, they should be applied automatically as the author writes, and the author then doesn’t have to worry about making the story or whatever look good, as it happens as if by magic!
Say you are writing, something, anything! You starting typing and the words appear on the screen, and your thoughts appear in concrete form. They are a certain size, a certain colour, and they are in a particular font. A font is the collection characters that, in this case, is shown on the screen in the editor.
They are also in a particular position on the screen. In the WordPress editor that I am using at the moment each paragraph that I type will appear as a paragraph on the page that the user will eventually read. In this case the lines of type will all start at the same distance from the left of the screen. Technically, all the lines in a paragraph are ‘left aligned’.
I’ll just mention here that all modern word-processing editors try to show the text as it would appear in the final result, whether it is in print or on a screen. This doesn’t matter so much for an email, but it is crucial for a story or novel which will be printed or read on a small device. What the screen shows should close to the required result.
Left alignment of all the paragraphs is fine for web pages, but I prefer a different arrangement for paragraphs in my stories, whether my story is read on a device or on paper. I prefer that the first paragraph in the story, chapter, or scene is left aligned, but that subsequent paragraphs are indented a little. You can see the effect in any of my stories, which you can find in this part of my website, and also in the image below.
To achieve this, I use ‘styles’ in my word processor. Without getting too technical, a paragraph style describes how the paragraph should look. For example it describes what font should be used, what size the characters should be, their colour, and how the lines are laid out, and many other things.
To save myself work I start with the ‘default’ style, which will be laid out more or less like the paragraphs in this post. I copy it and give it a name like ‘paragraph no indent’, and save it. It inherits all the settings from the ‘default’ style, even the fact that it is based on the ‘default’ style.
Then I copy the ‘paragraph no indent’ style and call it ‘paragraph ident’, tell it to indent the first line, and save it. Now that I’ve got my styles I link them together. I change the built-in ‘Heading’ style so that, by default the next style is ‘paragraph no indent’. I change the ‘paragraph no indent’ style so that by default the next style is ‘paragraph indent’ and finally I change the ‘paragraph indent’ style so that the next style is still ‘paragraph indent’.
Indentation Example
That all takes a minute or two and is harder to describe than to do. I then save the whole thing as a template. So I can open a new document and type a heading, assigning it the ‘Heading’ style. When I hit enter a new paragraph will automatically be created with a style of ‘paragraph no indent’. After I’ve typed the first paragraph and hit enter, another new paragraph is created with a style of ‘paragraph indent’. All subsequent paragraphs will have a style of ‘paragraph indent’.
Sounds complex? It isn’t really, and I only have to do it once. If I start a new document from the template all the styles are already there, so I can just start typing. And suppose for some reason I wanted all the indented paragraphs to be in a different font in a particular document. If I didn’t use styles I would need to go through my document and change the fonts by hand. But I can just change the font in the ‘document indent’ style, and all the indented paragraphs would be changed, in a second.
This is the big deficiency that I have found in most story writing software. The programs either do not allow the use of custom styles at all, or the custom styles are not easy to use.
Where the story writing software programs do excel is in organisation of the writing process. Most story software allows you to make notes, define characters, storyboard the story, and it breaks down the writing process into chapters, scenes, and so on. It also links all these things together in a logical way.
I’m impressed, but I don’t work that way. I often don’t have a clue what the story is going to be about until I’m actually writing it. I don’t know if a character who turns up is going to be pivotal to the story or whether he or she is just a spear carrier. I don’t have chapters or scenes in my mind. They just happen. This style of writing is known as ‘seat of the pants’ writing, and I’m firmly in that camp.
Many other writers prefer to plan out their writing projects to varied levels of detail, and may take longer to plan a story than to actually write it. I suspect that the whole process takes about the same amount of time, whichever camp you fall into – ‘planner’ or ‘pantser’.
One of the most popular of the story writing packages is called ‘Scrivener‘. It runs on Windows and Mac only, so it wasn’t really on my radar, and if you are a planner (who works on Windows or Mac), then it may suit you very well. From a quick look over, it seems to me that Scrivener can take your minimally formatted document when it is complete and can then ‘compile’ it into a format that suits you, with all the styles that you might desire.
Once again, I don’t work that way. I like to see roughly what I am getting as I write. And surely, if you want to make a change after the document has been compiled you will need to make the change and then re-compile?
To be fair, Scrivener advertises itself as “everything you need to craft your first draft”, and it is suggested that you use another program for the final formatting, but from what I have seen of it, Scrivener actually seems to be much more than that. You can compile your story so that it can be used to create a paperback. And you can compile the same story to be suitable for an e-reader, and you could also generate a PDF of your story. That feature is pretty cool!
But, Scrivener aside, the story writing packages don’t impress me much, because of the style issues, and the other facilities that they provide I wouldn’t find much use for. So, I’m sticking with LibreOffice Writer for now.
Some of my stories have been published on Amazon (as eBooks and paperbacks) and Kobobooks and Smashwords (as eBooks). Here are the links to my Author Pages on those sites.
The previous post, which I posted on February 20th, was about the possible extinction of the human race as a result of global warming. Since then, the Covid-19 virus has become a huge threat, and we all have to self-isolate and stay home. It’s not an extinction threat, but it is a threat.
For those of us in paid employment, self-isolation means working from home, which of course brings problems, especially with regards to any children who are in the home. Even though in most cases there will be partners at home who can give the home worker a hand looking after the children, it may well be that both partners are working from home, and it then becomes a question of how child care is arranged between the partners.
That could be a problem of course. But for those of us whose children have left home, there is a different issue. Typically, a married couple or long term partners have different interests. That’s fine in a “normal” (scare quotes) situation, but in these unusual times, couples are forced more closely together.
That can be a mixed blessing. You may be able to recapture some of the attraction that brought you together in the first place, which, while not lost, has mutated into a more mature relationship. But you have matured, and you will have, usually, developed interests which you partner may not share.
They may not share your interests, but they will support you in them. They will tolerate your culinary experimentation, while you will indulge them in their taste for art house cinema.
So, I am a writer and a geek. My wife tolerates these interests, just as I indulge her in her liking for quiz shows on the TV. I actually enjoy them too.
I’m a deep geek. I have written low level routines for several Operating Systems, and I’ve even written programs which run at a hardware level on some. Don’t worry about the terms I use. It just means that I have delved as low as it is possible to do so without actually designing computer chips and the circuits that they operate in.
So, what has this to do with my title? Well, in the absence of doing things like shopping, at the supermarket and other places, which I’m happy to do with my wife in normal times, of course, how do I fill the hours?
Well, I’m spending a little more time on my writing, but on the geek side of things, I’ve been looking at moving my web site from WordPress to Drupal. Not seriously. I’ve long been a fan of Drupal, but I’ve settled on WordPress as my platform of choice, and that is unlikely to change.
Drupal is much more flexible than WordPress. That means of course that it is more complex. WordPress has ‘posts’ and ‘pages’. Pages are static, intended to have a long lifetime. Posts are intended to be ephemeral, at least in terms of relevance. You might want to look at a post from three years ago, but you are more likely to want to read a recent one. Pages are the things that tell people about you (“about” pages) or allow people to contact you (“feedback” pages), and so on.
Drupal has ‘Article’ and ‘Basic page’ ‘content types’ which, roughly correspond to WordPress posts and pages, but you can easily add extra content types in Drupal. Drupal has a highly complex system which allows you to do this, often using one or more of an extensive list of modules which enhance the system.
WordPress also has a system, the plugin system, which allows you to extend the base system. In fact there are thousands of plugins, but if you can’t find one that you want, you may be able to cobble something together from existing plugins.
So these are the things that I have come across so far in my geeky delving. I downloaded the Drupal 8 package onto my ‘server’ (otherwise known as the computer in the back room) and installed it.
Drupal works out of the box, after a fashion, but you would probably not use it like that. Some things can be fixed, like the site logo, but others need one or more modules.
I set about downloading and installing the modules necessary to make the site look better. One example of Drupal’s quirkiness out of the box is that Articles and Basic Pages have addresses like https://<site-name>/node/293. A module is necessary to change it to something user friendly like https://<site-name>/feedback for the feedback form.
Somewhere along the line I discovered that the correct way to install Drupal and its modules these days is to use a program called ‘composer’. This is basically a package management system. Yes, yet another package management system to learn. Oh well. So I blew everything away and started again from scratch.
Next I downloaded the modules necessary to allow me to import my WordPress website into Drupal (using ‘composer’). I always knew that it wouldn’t be an exact fit, but at least I would be able to see what it looked like, and what I had to do to make it look reasonable. I wasn’t trying for an exact copy of my WordPress site.
I managed to import my Posts and Page from WordPress into Drupal as Articles and Basic Pages, and they looked, um, OK. So I went looking for ‘themes’. Both WordPress and Drupal have themes, which are essentially great bunches of CSS (Cascading Style Sheets) and JavaScript. They can change the look and feel of a site in an instant. I downloaded it and installed it via the ‘composer’.
That was a lot better, but I wanted to tweak the styles a little, so I sub-themed it and created a small file with just my changes in it. This small file overrode the parts of the main theme, while the main theme supplied the rest. Or so the theory goes. In fact I had to add some parts of the theme configuration (the ‘regions’) to my sub-theme to make it work properly. I don’t know why sub-themes don’t inherit everything from the main theme automatically. It seems sort of broken.
I discovered that the images in my Drupal site still pointed to my WordPress site, which was a nuisance. One way to prevent that would be to edit the Import file and manually change the addresses. Definitely do-able, but I shelved that problem for now.
Another thing that I spotted about images was that the images that I uploaded appeared under the ‘Images’ tab of ‘Content’ part of the Admin pages. But there was another tab, labelled ‘Media’ which was empty. After a bit of reading I discovered that there is move away from images towards Media Image objects, which are more like WordPress Media images.
Which sounded great until I found that there Media Image objects could not (currently) be embedded into content via the WYSIWYG editor. No button. But this is, fortunately, scheduled to appear in the next release of Drupal.
And that’s about when I gave up. Drupal is a great CMS, but it is not easy to learn, like WordPress. I could use it, but it would take a lot of work, and maybe I’ll delve into it again at some time, but for now I’m happy with WordPress.
Drupal is flexible, but the price of that flexibility is complexity. I was trying think of an analogy to contrast the two CMSes, but the only ones that I could think of denigrated one or the other in some way. There’s more than enough room for both.
Who am I writing for? What is my audience? That’s actually a hard question to answer.
Firstly, on a superficial level, I’d hope that the age group that I would hope that I’m writing for would be “Young Adult” and above. I looked up what that means and there is no real consensus on the definition, but it can refer to children from the age of 12 or 13 or up. That’s a little low, I think, for Young Adult,
However, that’s not an issue so far as my writing is concerned as my characters don’t go beyond a smooch and a hug or two. What they get up to in private is entirely up to them.
I’d hope that the absence of any salacious bits doesn’t restrict the upper age limit of those who read my books and stories. It’s the story that matters, of course, and the characters.
Speaking of characters, I’ve discovered that, so far at least, I haven’t created a decent villain. I’ve created characters who could have been villains, but have turned out to not be villainous as the story develops. A vampire. An assassin. The few villains that I have created have been unimpressive. An insane Khan who quickly gets killed off. A few inconsequential Kings.
On the other hand, it seems that I find it easy to create heroines. When I look back at my stories, a big majority of them have a heroine. I wrote ‘feisty’ there but took it out. Nasty word. My heroines can be dominant, but they aren’t, as a rule, aggressively so. They are, in general, the equals of my heroes, but they have a larger role in the story. Maybe they are the prime characters.
My signature characters are the Mage and the Boffin, and they demonstrate this well. The Mage specialises in magic and the Boffin specialises in science (or physics, they would say), but there is a crossover. The Boffin is very much the mother figure, and the Mage is a father figure.
The Boffin quite often takes the lead in their adventures, but it is evident that she believes that the partnership is 50/50. The Mage doesn’t disagree. He follows where his wife leads, but without exception, they are always headed in the same direction. They very rarely differ, and each respects the other and the other’s view of the world.
The Mage does not feel dominated by his wife. In fact, he often finds her direct approach amusing. For example, the Boffin blasts a cell door when someone incarcerates them, and he merely inquires whether or not she is feeling tetchy, since they could have simply ‘stepped’ out of the cell.
So, what would I say my genre was? I’d say ‘fantasy’, but isn’t all fiction fantasy? Technology in my stories tends to be simpler than our technology, but some more modern stuff does creep in now and then.
I’m not too concerned about anachronisms. I’m not worried about inconsistencies, except within a story, and if the same character appears in more than one story, I don’t expect him or her to be exactly the same, to remember the same things, to do the same things.
I could explain this by pointing at the core mechanism that occurs in many of my stories – the idea of multiple worlds, and multiple versions of a character – but that’s not really the explanation. No, the real reason is that the stories are seemingly linked, but are actually independent.
I do like to keep my storyverse consistent though. It’s just that I don’t fret if it isn’t.
But to come back to my original question – who do I write for? Well, my stories are up on my website, and I know that people do stumble across it. I don’t know, because I haven’t looked, how many people have downloaded them.
Similarly, some of my stories, collected into books, are available as eBooks or even paperbacks. I have looked to see if anyone is buying them, but so far as I can tell, no one is.
So, I still keep writing them and polishing them and making them available, which means that I am, simply put, writing them for myself. I enjoy the process of writing, and when I start a story, I often don’t know where it is going to end. It’s a process that might be called ‘reading by writing’.
I’m happy to keep doing this, for as long as story ideas come to mind. Sometime someone may read on of my stories and enjoy it. That will be a bonus.
Some of my stories have been published on Amazon (as eBooks and paperbacks) and Kobobooks and Smashwords (as eBooks). Here are the links to my Author Pages on those sites.
This is yet another post about the writing process. OK, it fascinates me, as I consider what happens in my brain/mind as I write something, but I risk the possibility of it not being interesting to anyone else. It’s around 1500 words long, which is a bit longer than my usual posts.
So, the conventional view of the writing process is that it is a linear process. The writer sits down at his or her desk, starts furiously writing, casting off page after page, until with a final flourish he types or writes “The End” and the deed is done.
The real process is much more dynamic than that, at least for me. The following is a brief description of what happened when I wrote a story that I have written about in previous posts. I haven’t included any elements of the story because I want to concentrate on the process.
The End
In a previous post, I wrote about a story that, as I wrote it, became too long for the competition in which I wanted to enter it. When I had completed it, I modified it and shortened it. However I wasn’t happy with the result, so I abandoned it, and started again from scratch, cutting and pasting bits from the original now and then.
This worked fine and I submitted the story into the competition. However, I now had three versions of the same story, and one of them, the original short one, was significantly different from the other two. A core topic in the story had changed, and the motivation of the main character was consequently different. There were other things about that version that I didn’t like so I considered consigning it to the bit bucket. However (fortunately) I didn’t do that right away.
I was happy with the version that I submitted for the competition, but I felt that the longer version could be improved. With no limit on the length, I could be more descriptive, go into the characters a bit more and draw out their motivations and fill in their back stories. I could also pull in bits from the short version which did work, and also ideas from the competition version that weren’t in the longer version.
Merging three stories into one
I hope that I’ve given some idea of how complex this was. I was effectively merging three versions into one, and some bits didn’t fit together too well. I was constantly revising the longer one so that the timeline and the events fitted together properly with the bits I was getting from the other two versions. Normally things don’t get as complex as this for me!
After I got a consistent story, I developed it further. I’d add a paragraph or two to bring out the motivation of some character or other, and as a result one or two of the minor characters blossomed into being more than minor characters.
Initially the main character and his wife were a bit aloof, but I decided to make them more sociable, more friendly. The wife mostly dropped out of the main story, but returns for a major cameo. Another major character developed to become almost the equal of the protagonist, and a minor character emerged from the shadows to become a more rounded character.
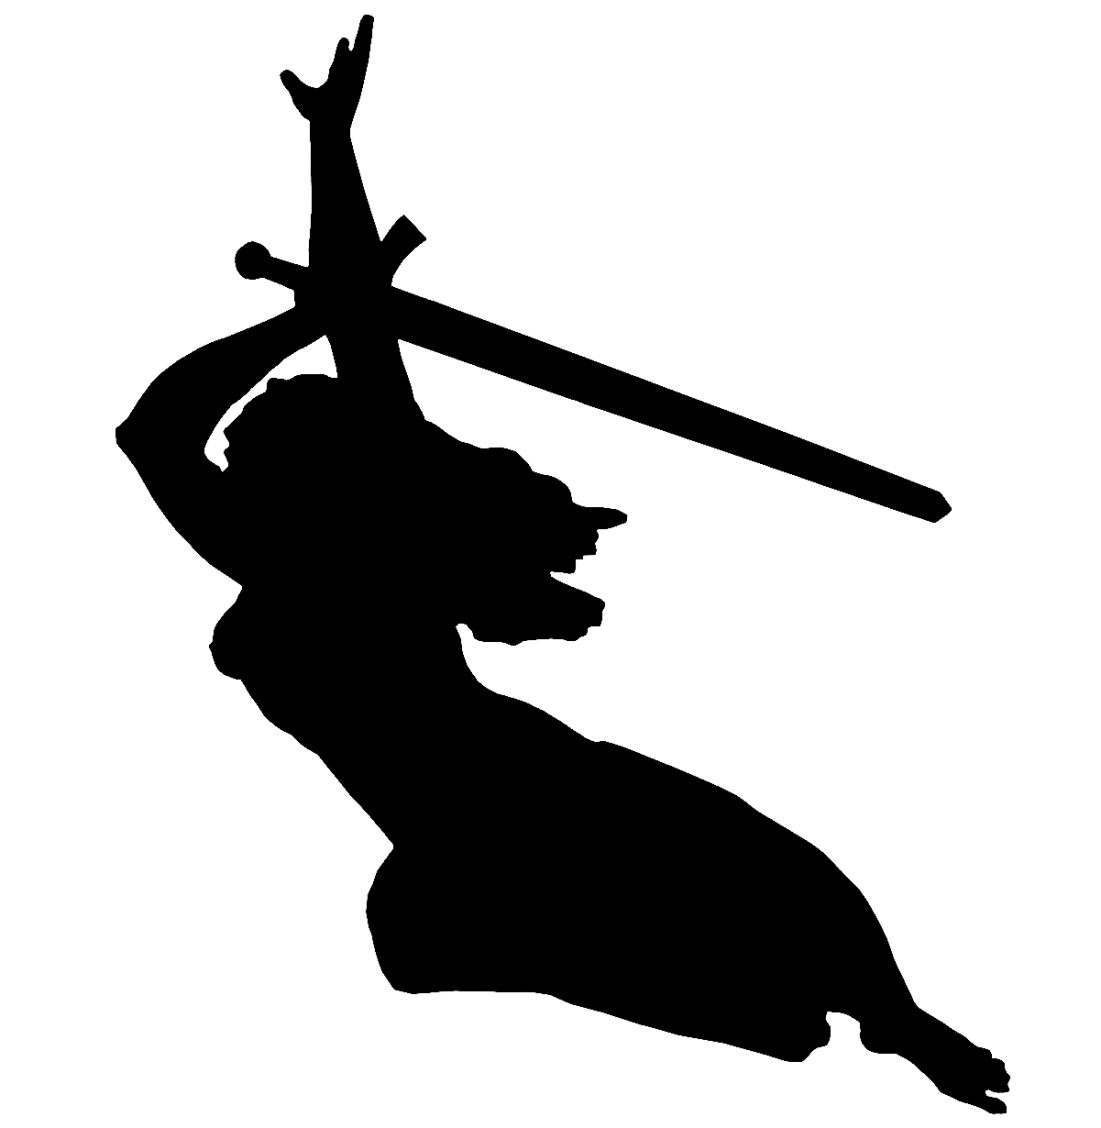
The Protagonist, but not of my story! It’s actually the goddess, Nike.
By this stage my story was complete in the longer version, and, because I had effectively gutted and abandoned the original shortened version I deleted it, as mentioned above. So now I had two versions, the shorter competition version and the longer version.
Now, when I’ve written a story, and although it is in a sense complete, I don’t leave it there. I read it through, again and again, constantly revising and modifying it. I don’t usually change the story that much, but I go after spelling errors, grammatical errors, continuity errors, and so on. In every run through I change something. Maybe just the way that I said something. The position of a word in a sentence. Maybe a name, a location, a motivation. I could keep editing probably for ever. I never write “The End”.
My main point here is that, using modern technology, I have been able to, basically, rewrite the story twice and extend and revise the original story dramatically.
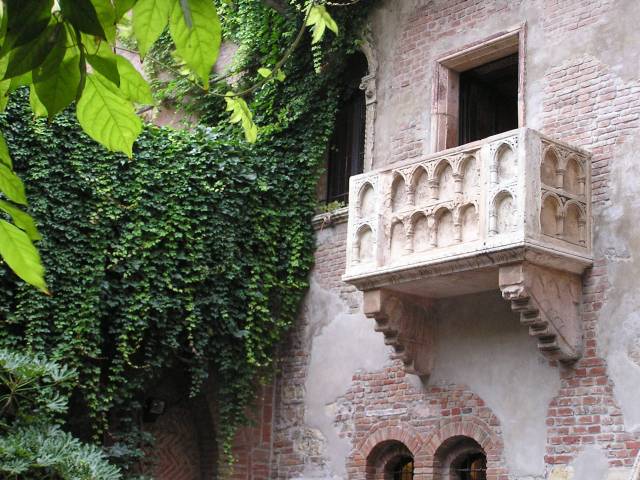
A balcony in Verona which has nothing to do with Romeo and Juliet, but still gets visited and photographed by tourists who think it has.
I wonder how ancient writers did it. I can’t imagine Shakespeare turning out multiple drafts of his plays. For one thing, he did it by hand. To create a new draft, he would have to write out the whole thing again with the changes. The decision to change the name of a character from “Fred” to “Mercutio” wouldn’t be taken lightly. For another thing, paper was, relatively speaking, expensive in those days. Printing was expensive.
Once he had written the play, it would be printed, but only a few copies would be produced. The printed copies were not intended for general reading, but were intended as “prompt books” for use in a theatre. This means, of course, that each printing might be different.
Old books. I imagine that Shakespeare’s plays would have been printed in books like this.
I’ve not heard of Shakespeare making notes or outlines of his plays, but maybe he did. Maybe somewhere there is Shakespeare’s hand a scrap of paper that says something like “R sees J on blcny. J doesn’t see R. R calls J, J calls guards. R thrown out.” But we know that the final version doesn’t run that way!
I conclude that Shakespeare probably had the whole play mapped out in his mind, or at least great parts of it, including the words that he invented, the sentence construction, the characters and the plot. It’s an awesome feat if he did do it that way. The idea of juggling all those characters and scenes in his head, developing the story, and finally getting it down on paper in an almost final version is amazing.
Well, I wrote that before actually wondering if there was anything on the Internet about how Shakespeare wrote his plays. The answer is fascinating, at least to me! It seems that Shakespeare and his fellow playwrights of the era cooperated extensively with each other, adding bits to each other’s plays. So Shakespeare’s plays were, in part, written by others! Interestingly, that’s very similar to the way that TV shows are written today, I understand.
An author at work
We have the luxury, these days to dash off a story (or a play or whatever) and not worry too much about the details. We can fix those on the second go through! Electrons are as cheap as chips. I could have edited the bit about Shakespeare above, but I wanted to demonstrate how I was thinking, since this is post is about my thought processes when I write things.
So, I’d say the my writing style is like opening a can of worms. Who knows in what direction they are going to wriggle? Who knows where they are going to take us? I have a strong feeling that when I write a story, I’m only nominally in charge. The characters seem to have a life of their own, and they have their own needs and desires. They interact in way that I would not have predicted when I started writing their story and often the story changes as I write it. I’m often interested in how it is going to turn out.
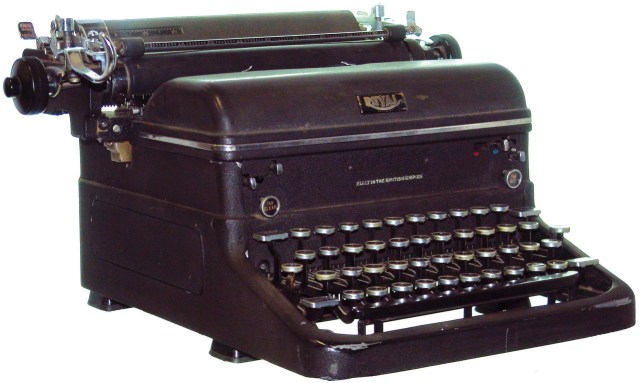
That’s how I write. But others do it differently. Some, even in this electronic era write things out by hand. Others use mechanical typewriters and a few swear by old, really old, versions of software.
Mechanical typewriter
Things are different from Shakespeare’s day in many ways. It is more usual to write novels, rather than plays, and books are cheap and widely available. Writers do not, as a general rule, cooperate, as in Shakespeare’s day. A book will perused by an editor and checked by a proof reader many times before it is printed, and may be revised many times.
Even for those who write things by hand have the advantage of paper being cheap and readily available. They, and those who use mechanical typewriters, can easily rewrite a page and slot it into the manuscript fairly easily.
But some people prefer that approach and good luck to them! And there are those in the middle. Those who might have plot in mind or a set of characters, but aren’t about to spend time in developing the plot or the characters in detail. That’s maybe most writers.
Whatever approach you prefer, it is a good idea to research how to write. How to structure a story, how to develop characters and so on. It’s silly to think that all you need to do is pick up a pen and write, and you will produce a best seller. Even the best writers didn’t do that. They wrote at home and at school as kids, and they will have read voraciously, in all sorts of genres, and they may have actually formally studied literature. They will have practised extensively. And that’s what I am doing, and continue to do. Studying and practising. It’s one of the reasons for this blog!
Editing the first draft. That’s not me. I would be doing it directly on the computer!
There are hundreds of tutorials for Blender. Maybe thousands. As you might expect they vary in quality from not-so-good to very good. One of the characteristics that they all seem to share is that they are fast! Some are far too fast, some are not too fast and I can keep up with them. What I’ve decided to do is watch a tutorial without making note of the techniques used and then go through it again stopping and starting to get a better idea of what is going on.
Another issue is that Blender is complex, as it needs to be to produce realistic 3-D images. That often means that there are usually several ways of achieving something, and a tutorial author might prefer one over another for some reason. Rarely does an author go into why he did something a particular way, and if he does, it can be incredibly useful.
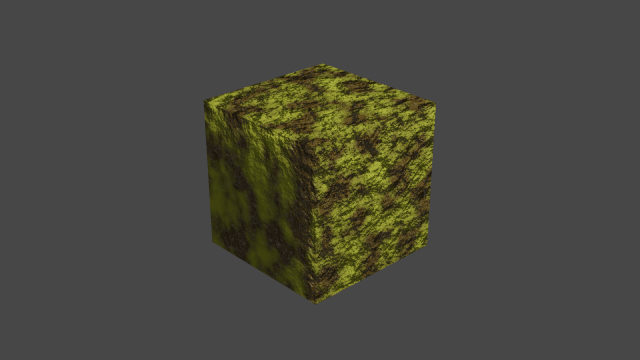
Anyway, I’ve been looking into ‘materials’ and ‘textures’ recently. ‘Materials’ are the stuff that things are made of, like ‘metal’ or ‘marble’. Textures are, as someone said in a tutorial, descriptive of the material. For example a metal object may be rusty, or a marble object might be dirty.
Fabric covered ball
There are hundreds of free materials and textures available for anyone to download. I’ve downloaded a few from Chocofur who provide a several useful packs of free materials for download. You can also purchase some impressive models from them.
Another source of useful materials are the tutorials. Sometimes a tutorial author will include the materials that he has used in his tutorial, to help those who have taken his tutorial, so that they can repeat the steps he took in his tutorial and learn that way.
Of course, a simple image downloaded from the Internet or a camera image can be used as a source of material and/or textures, but that means that the artist will need to do more work, which brings me to another point. When a texture is downloaded from the Internet, it is usually in the form of a “blend” file which has to be ‘appended’ to the model being created. (A “blend” file is the format in which Blender saves a file, whether it’s one of your own creations or one from the Internet) When I downloaded my first materials, I didn’t know this, so I just used the images from the downloaded files. This produces results which are, basically, rubbish.
A downloaded texture usually contains several images, used for different purposes – as a colour map, a displacement map, or one of several other types of map. I use the word “map” loosely here. These are used in the “shader” in various ways. I’m not going to define “shader”, but loosely, it’s how the material/texture is applied.
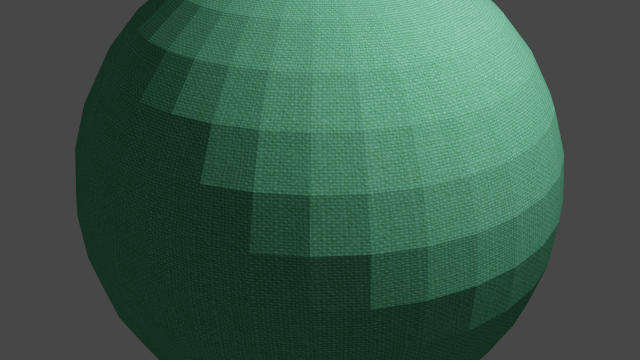
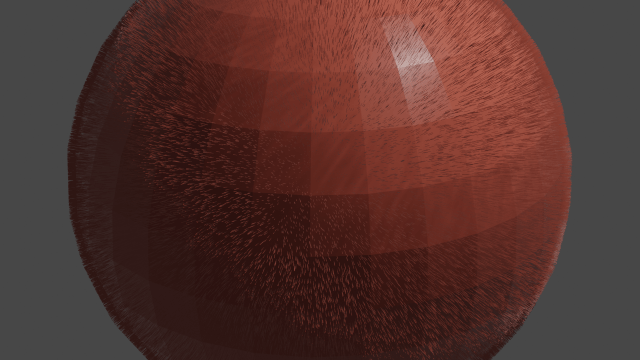
A hairy ball
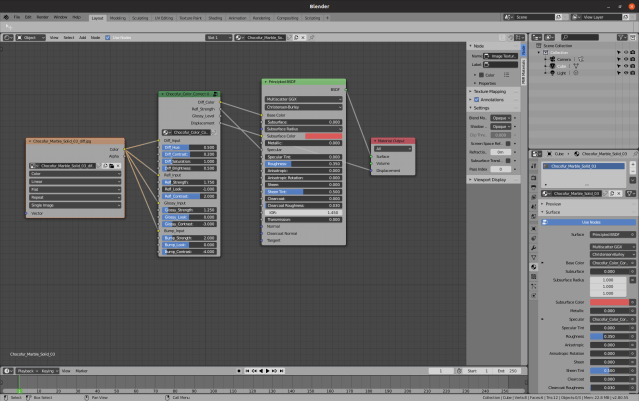
What I didn’t realise when I started to look into materials, and textures and shaders was that it is fun to play around with them. A shader is a bunch of nodes linked together. Each node is a box with adjustable sliders and values in it, and you can play with them to your hearts content.
Here’s one of Chocofur’s shaders below. Note all the options that you can change! You can also add other nodes to modify the provided shader, and that where the fun begins! Of course, it helps if you know what the nodes do, but that doesn’t prevent experimentation of course.
Node map of Chocfur’s Solid Marble shader
OK, to end with I’m going to show you two of my images, created in the last week or two. They are renders of a cliff face. The first is my first attempt. I created a plane mesh and subdivided it with the fractal parameter set to non-zero. This has the effect of “crumpling” the surface a little. Then I added a pretty bland texture and rotated the plane so that it looked like a cliff.
Cliff version one
There’s obvious problems with of course. It’s pretty meh! And the bands across it are distracting. Here’s the second attempt.
Cliff version two
This one is the opposite of the first! It has a bolder material, and is considerably more crumpled. Back to the drawing board. Oh, and I’ve got to work on the lighting.
Please read my books. The paperback versions can be found Amazon, and the eBooks can be found there or at your favourite eBook store. Just search for my name, Cliff Pratt. I mainly write fantasy fiction.